How to Frame Your Finished Paint by Numbers Canvas
By Simon I., co-founder, Paint Kit Studio. Published 2026-05-06.
Megan emailed me Sunday afternoon. "Hi. Just finished my first kit (the cherry blossom one). It looks fine on the canvas. But it doesn't look like 'art'. Do I need to frame it?" She'd attached a photo. Tilted phone shot, painting propped against a coffee maker on her kitchen counter. The painting was lovely. The presentation was nothing.
I get a version of this email two or three times a week, especially around birthdays and December. The honest answer is annoying because there are two halves to it. No, you do not need a frame. The kit is wall-ready the second the varnish dries. And yes, almost everyone is happier when they pick a frame, because the frame changes the room more than the painting changes. Both true. Both useful. Picking which half of that to act on is what this post is about.
I have my own take which I will get into. But there are four real options for finishing a paint by numbers canvas, and the right one depends on your wall, your budget, and how much you want the painting to anchor the room. About 1,800 words. Pour a coffee.
Key takeaways
- Every Paint Kit Studio canvas ships pre-stretched on a 2 cm wooden frame. You can hang it as-is. No frame purchase required.
- A floating frame is the sweet spot for most painters. Around $30 to $80, ten minutes to fit, dramatic visual lift.
- Black floats almost everything. White lifts cool palettes. Walnut warms portraits and landscapes.
- Glass is mostly unnecessary for canvas. The varnish layer is the protective barrier. Save the cost.
- UV light is the slow killer. A west-facing wall in direct sun fades cheaper acrylic colorants over years, not days.
Bottom line: pick the option that matches your wall and your budget. There is no wrong answer here.
Should I even frame this thing?
Skipping the frame is a real option, even though I rarely recommend it. Every kit we ship comes pre-stretched on a 2 cm wooden bar, which means it is wall-ready the second you finish varnishing. Drive a sawtooth hanger into the back, hammer a nail, hang it. Total spend: under a dollar. I have customers who do this with every kit and never regret it, mostly people with modern interiors and a lot of wall space.
That said, framing changes how the painting reads in the room. Without a frame the canvas can come across as a craft project (which it is) rather than as art (which it also is). With a frame the painting borrows some of the visual gravity of every other framed thing your eye has ever read as art. That sounds shallow but it is real. We are pattern matchers, our eyes have seen ten thousand framed paintings, and a frame triggers the "this is art" recognition before we even register what we're looking at.
Framing also has a less glamorous benefit. It keeps the painting away from sleeves, walls, and small children who are about to lean against it. The Smithsonian Museum Conservation Institute is plain about why this matters with acrylic. "Protective framing has been suggested as a good way to exclude dirt." (Caring for Acrylic Paintings, Smithsonian MCI, n.d., retrieved 6 May 2026.) The dirt point is the one most people undersell. Same source, same page. "The surfaces of the soft acrylic films hold onto dust and dirt." A bare canvas in a hallway picks up grime over the years. A framed one does not.
Option 1: Hang it bare (the gallery wrap look)
Cost: zero to five dollars in hardware. Time: five minutes if you own a hammer.
The bare-canvas look is what gallery shows do. Painting hangs unframed, edges painted (or wrapped over), wood stretcher behind. Reads modern, casual, deliberate. Works in studios, lofts, contemporary apartments, and any room where a fussy frame would feel out of place. It is also the only option that costs nothing and takes one trip to the hardware store.
Two ways to actually hang it.
- Sawtooth hanger. Tiny zigzag bracket, nailed to the top centre of the wood stretcher. About a dollar. Five seconds to install. Carries up to ten pounds, which is more than any of our kits weighs. Fine for almost everything.
- D-rings with picture wire. Two D-shaped brackets screwed into the sides of the stretcher, picture wire stretched between them. Slightly more money, slightly more work, gives you horizontal slide on the nail so you can level the painting after hanging. Worth the extra five minutes for larger canvases (40x50 cm or above) where any wonkiness is more visible.
One thing first-timers forget. The white edges of the canvas are visible from the side. If you painted only the front face and left the sides raw, you'll see thin white strips when you look at the painting from an angle as you walk past it. Two fixes. Either paint the side edges in a single dark colour (black, charcoal, or a colour pulled from the painting itself) before you hang. Or accept the white edge as part of the gallery-wrap aesthetic. Both fine. The first reads as a touch more deliberate, the second is honest about what the canvas is.
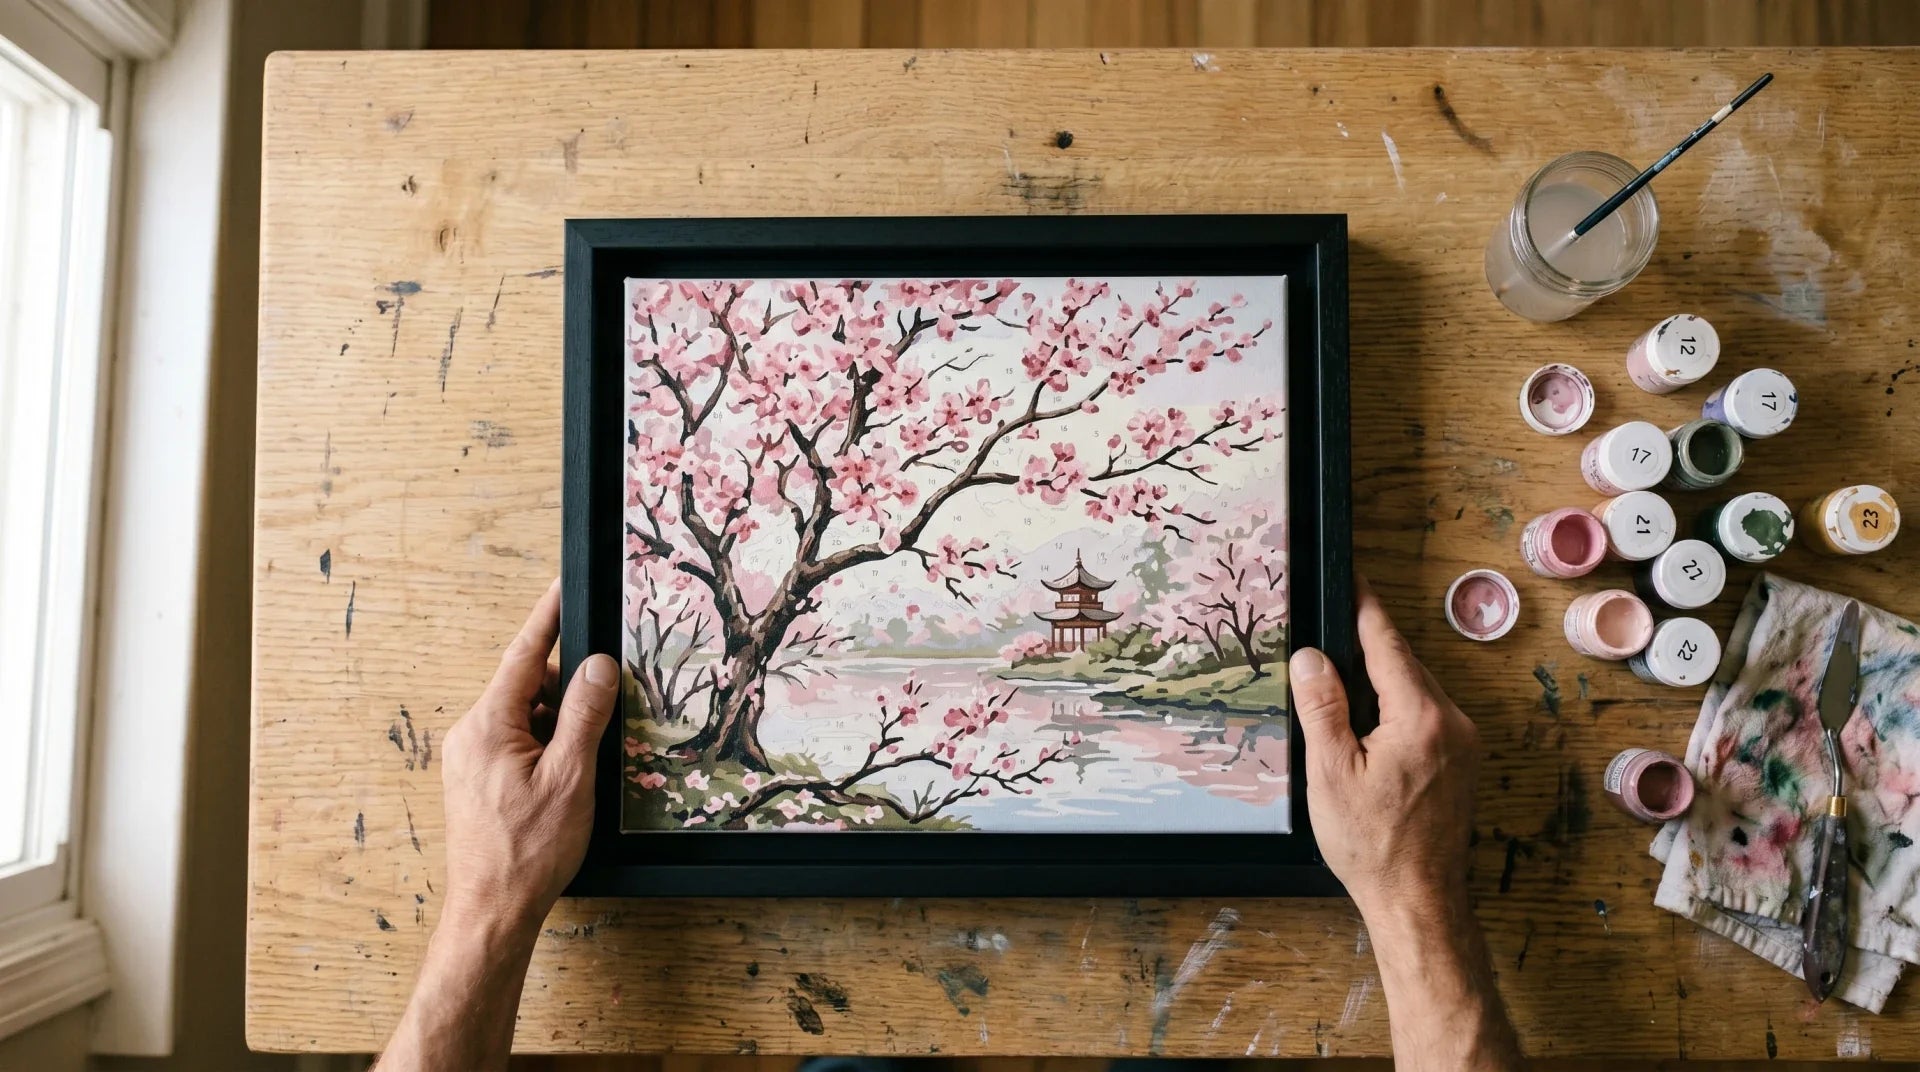
Option 2: How does a floating frame work?
Cost: $30 to $80 stock size. Time: ten minutes to fit.
This is what I tell most people to buy, and what we use ourselves on the canvases hanging in our office. A floating frame holds the canvas with a small visible gap (usually 6 to 10 mm) between the canvas edge and the frame interior. The painting looks suspended inside the frame, with daylight visible around the edge. You get the cleaned-up boundary of a frame, and the painting still reads as a stretched canvas rather than a flat print. It is the option that gets you most of the visual upgrade of a custom frame for a fraction of the price.
Fit is dead simple, which is why I like it. The frame has clips or screws on the back that grip the canvas's wooden stretcher. You drop the canvas in. Secure the back. Attach a hanging wire. Done. No matting, no glass, no professional help required. The first one I ever fitted took me eight minutes and I had never done it before.

Where to find them.
- Online. Amazon, Wayfair, Etsy. Search "floating frame canvas" plus your kit size in inches or centimetres. Most kits we sell are 16x20 inches or 40x50 cm. Both are common stock sizes which is why we picked them.
- Big-box craft stores. Michaels, Hobby Lobby, Joann's in the US. The Range, Hobbycraft in the UK. Spotlight in Australia. Most carry stock floating frames, and the weekly 40 to 50 percent off coupons drag the price down to the $20 to $30 range. We ask customers to time their frame buying around these coupons whenever they email asking us.
- Custom framers. Pricier (often $150 to $250 for a custom floating frame). Worth it if your wall is the focal point of the room and you want exact colour-match to the wood floor or trim.
Colour rules. Black floats everything and is the safest possible pick for any palette. White is bright and crisp and lifts cooler colours (sky, water, flowers) but reads stark on warm earth-tone paintings, which is why I tell people to avoid white frames on sunset and autumn-themed kits. Walnut or oak warms up portraits, landscapes, and any kit with a lot of brown, gold, or sunset tones. If you have a wood floor, picking a frame in the same wood family is usually the strongest visual move.
Option 3: When does a traditional matted frame make sense?
Cost: $80 to $300 (DIY kit or stock). $300 to $700 (custom shop). Time: 30 minutes plus, or a one-week shop turnaround.
A traditional frame is the formal old-master setup. The painting is recessed inside a moulding profile, often with a paper or fabric mat (the bordered cardboard layer) between the painting and the frame. This is the look that signals "old gallery" or "private library" and works beautifully when the room has the architecture to match.
Where it earns its price. Salon-style hangs (multiple framed pieces clustered on one wall). Stair galleries running up a banister. Entry vignettes where one painting greets people through the door. Living rooms with crown moulding, deep wall colours, and other framed pieces already on the wall. In those settings a traditional frame tells you immediately that the painting belongs there.
Where it does not earn its price. Casual modern interiors with light walls and minimal decor. In those rooms a heavy traditional frame can feel like the painting got dressed up for a party nobody else was invited to. The painting and the room end up arguing.
One catch with PBN canvases that catches people out. Most traditional frames are designed for a flat work on paper or a thin canvas mounted to a board. The 2 cm depth of a stretched canvas often will not fit. Two solutions. Pick a frame moulding deep enough to accept the stretcher (these exist, search "deep-rebate canvas frame" or "shadow-box style traditional frame"). Or pop the canvas off the stretcher and mount it to a flat panel before framing, which is a job for a custom framer rather than a DIY because the canvas needs to be re-tensioned. If you go traditional, keep the mat plain. Cream, off-white, or a quiet linen. Decorative mats fight the painting and almost always lose.

How do I pick a frame colour that works?
The mistake I see most often, by a long way, is people picking a frame that matches the dominant colour of the painting. Red painting, red frame. Green painting, green frame. The result is almost always disappointing. Frame and painting end up competing for the same eye attention, and the painting (which has way more visual variation) loses. People feel let down by the frame and don't know why. The why is competition.
Three rules that work for almost every kit, in order of how often I rely on them.
- Match the wall, not the painting. White wall: try charcoal or walnut frames for the contrast. Cream or beige wall: black frames anchor and pop the painting forward. Dark accent wall: a thin gold or matte off-white reads as a halo effect that lifts the painting toward the viewer.
- Pick the second-most-dominant colour in the painting, not the first. A sunset painting is mostly orange and pink, but the deeper background tone is often a muted blue or purple. A frame in that secondary tone reads as harmony rather than competition. This trick is the one I use when the wall colour is neutral and rule one isn't decisive.
- When stuck, go matte black. Black floating frames work on almost any kit in almost any room. If you cannot decide, this is the safe call, and the one I would make for myself in any unfamiliar room.
Do I need glass over the canvas?
Almost never. This question comes up most often from customers who are used to framing photographs or prints, where glass is standard.
Glass is standard on works on paper because paper soaks up moisture and pollutants from the air, and the glass forms a barrier. A varnished acrylic canvas does not have that vulnerability. The varnish layer (which you should always apply before framing) is itself the protective barrier. Adding glass on top is mostly redundant and adds glare and reflection that hurts the painting more than it helps.
The exception is direct sunlight. UV light fades pigment slowly, over years rather than months, but the fade is real. The Smithsonian MCI is direct about it. "The lesser quality paints tend to have cheaper colorants which fade easily under ultraviolet light." (Caring for Acrylic Paintings, Smithsonian MCI, n.d., retrieved 6 May 2026.) Our kits use higher-grade acrylic with stronger pigment binding, but no acrylic is fully UV-proof. If your wall catches strong direct afternoon sun for hours each day, the painting will visibly drift toward warmer tones over years, which is faster than people expect.
Two ways to handle the sun problem. The cheap fix is to move the painting to a wall that does not catch the sun, which is what most people end up doing once they think about it. The museum fix is to invest in UV-filtering acrylic glazing inside a deep-rebate frame, which adds $80 to $200 to the framing cost for the glazing alone. Skip standard window glass. It blocks some UV, but the glare and reflection it adds usually hurt the painting more than the UV protection helps.
Where can I actually buy a frame?
By price tier, which is how most people end up shopping for one.
- $0 to $10. Sawtooth hanger or D-rings. Bare canvas, gallery-wrap look. Buy from any hardware store.
- $30 to $80. Stock floating frame from Amazon, Etsy, Wayfair, or a local craft store. Where most people start. Where I would start if I were starting today.
- $80 to $200. DIY traditional frame kits or premium stock floating frames. Look at Michaels, Frame Destination, or specialty framing shops with a stock-frame aisle.
- $200 to $500+. Custom frame from a local framer. Worth it for the painting that anchors a room. Or for a gift you want to land harder, like a wedding or a milestone birthday where the framing itself becomes part of the gesture.
One tedious thing about buying online. Always sanity-check the frame's interior dimensions against your canvas dimensions in centimetres before you hit purchase. The float-frame industry uses a mix of inches, centimetres, and "fits a 16x20" descriptions, and the conversion is not exact. I have shipped a half-dozen replacement canvases this year because someone bought a 16x20-inch frame and assumed it would fit a 40x50-cm kit. Close, but the half-centimetre difference (16x20 inches is actually 40.6x50.8 cm) means the canvas wedges in tight or won't sit flat. The frame's listing should give you the interior dimensions in millimetres. If it doesn't, ask the seller, or buy from someone else.
Quick comparison of all four options
| Option | Cost | Best for | Effort |
|---|---|---|---|
| No frame (gallery wrap) | $0 to $5 | Modern interiors, studios, anywhere casual | 5 min |
| Floating frame | $30 to $80 | Most painters, most rooms (recommended) | 10 min |
| Traditional matted frame | $80 to $700 | Formal rooms, gallery walls, gifts | 30 min or shop visit |
| Custom framer | $200 to $500+ | Anchor pieces, statement walls | 1 week |
What about the paint surface? Does framing protect that too?
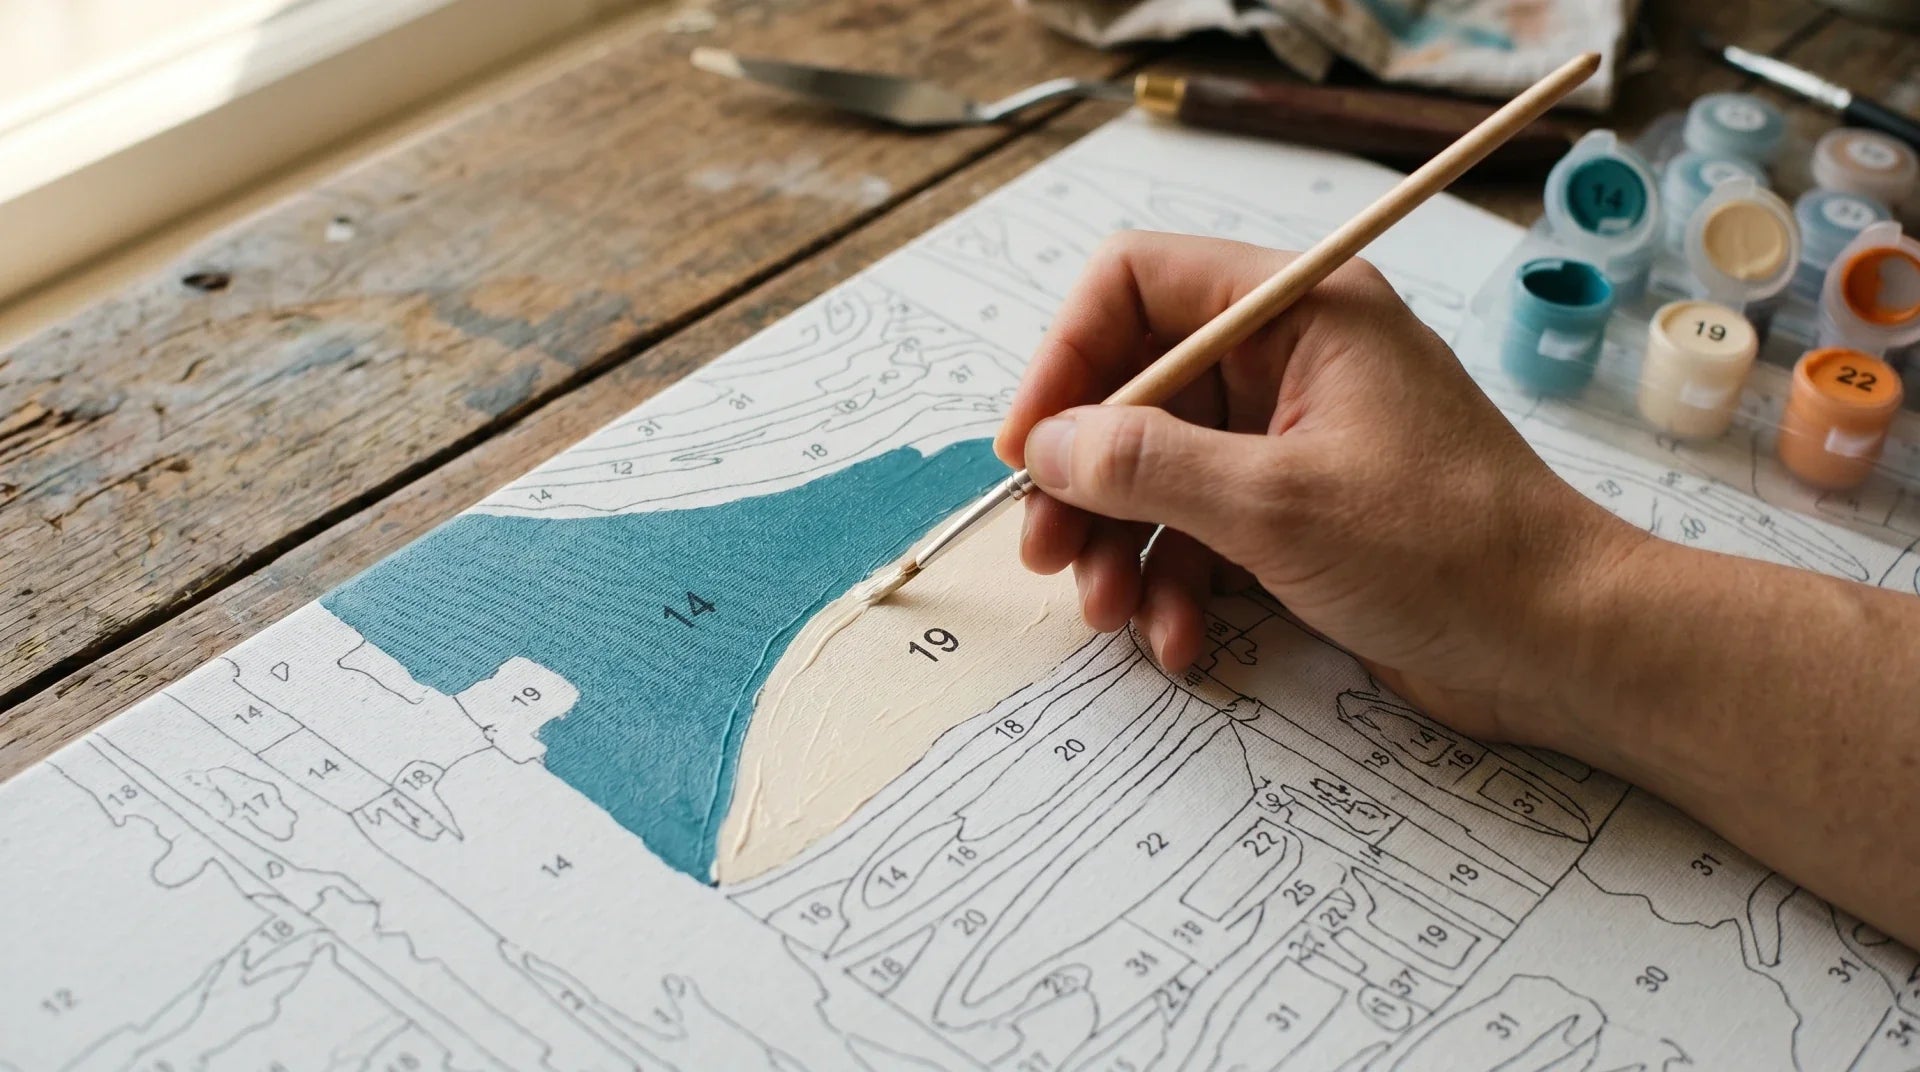
It does, more than people expect. Acrylic paint has an interesting property which is that it dries in two stages. The first happens in minutes (water evaporates from the surface, the topmost layer skins over). The second happens over weeks and months (the polymer particles slowly fuse into a continuous film). Golden Artist Colors describes the second stage in their drying notes. "The polymer spheres, composed of long chains of acrylic, actually deform and partially combine with one another in a process of film formation called coalescence." (Drying Technical Notes, Golden Artist Colors, n.d., retrieved 6 May 2026.)
The practical implication is that even after a kit is "dry to the touch", the paint surface stays slightly soft for weeks. A frame holds the painting away from sleeves, walls, fingers, and anything else that might press into a still-curing film. By the time you would think to bump the painting (a year out, ten years out, twenty), the frame has already absorbed every accidental contact for you. It is a slow protection but it is real, and it is the reason most of the customer-finished kits I see on Loox after five years still look as crisp as they did the day they were varnished.
Frequently asked questions
Can I frame a paint by numbers canvas before the paint is fully dry?
Yes, as long as the surface is dry to the touch, which usually takes 24 to 48 hours after the last brushstroke for a thin layer (longer for thicker applications). The deeper coalescence stage continues for weeks but does not require the painting to stay unframed during that time. The only thing to actively avoid is dropping the canvas face-first onto the frame's inner edge during installation. Lift, lower, level, attach. Slowly.
Should I varnish before I frame?
Yes. Varnish first, dry overnight, then frame. Liquitex puts the case for varnish in one sentence. "Varnishing acrylic works protects against damage, dirt, UV light, unifies sheen, and enhances color." (FAQ, Liquitex, n.d., retrieved 6 May 2026.) The varnish does most of the protective work; the frame keeps things off the varnish. Together they give you a painting that ages slowly. Varnishing after framing is technically possible but harder to do without dripping varnish onto the frame moulding, especially the first time you try.
What if my canvas is slightly warped?
This happens occasionally with humidity changes, especially in summer. Two fixes. Lightly mist the back of the canvas with water from a spray bottle, lay it flat, and weight the corners with books overnight (most warps relax out within a day). Or accept the warp and let a floating frame visually distract from it. The frame's gap absorbs minor canvas distortion well, which is one more reason floating frames are forgiving.
Can I hang the painting in a bathroom or kitchen?
Bathroom: not ideal. Humidity and steam accelerate the soft-film grime pickup the Smithsonian flags above, and over time can dull the varnish layer. Kitchen: fine, as long as it is not directly over the stove. Cooking vapours (oils especially) coat the painting over years and dull the colours. Pick a wall in the dining area instead of the cooking zone, which is what we usually suggest when customers ask.
What is the most common framing mistake you see?
Buying a frame that matches the painting's dominant colour. The painting and the frame end up fighting for the same eye attention. The painting loses. Pick a frame that complements the wall, not the painting. (And when in doubt, matte black floating.)
Ready for your next canvas?
If you haven't picked a kit yet, start with our paint by numbers collection for the full range. Most painters frame their first kit and immediately start a second, so plan accordingly.
Looking for designs that frame especially well? Seascape and Mountains & Lakes kits anchor a wall as well as anything we sell, and the wide horizontal compositions look great in floating frames. Portraits and Flowers work well in walnut or cream traditional frames where the formal feel suits the subject.
For a gift that lands hard, you can also turn a personal photo into a custom kit (a wedding photo, a pet, a family portrait) and frame the finished painting for an anniversary or holiday.
One more read for first-time painters: our Complete Beginner's Guide to Paint by Numbers walks through every step from unboxing to hanging.
Framing matters most on the larger pieces, which is why our paint by numbers for adults range leans toward sizes that are genuinely worth hanging.
Last updated: 2026-05-06.

.%20It%20looks%20fine%20on%20the%20canvas.%20But%20it%20do...)